Homemade Gingerbread House: Easy Steps for a Fun Family Tradition
The holiday season sparkles with cherished traditions, and few are as enchanting or delicious as building a homemade gingerbread house. Far from being a daunting task, crafting this edible masterpiece from scratch can be a wonderfully rewarding family activity that brings joy and lasting memories. If you’ve ever dreamt of creating a magical, sturdy, and utterly delightful gingerbread house, then consider this the ultimate guide to the best Christmas gingerbread house. We'll walk you through every step, from designing your custom template and baking robust gingerbread pieces to assembling and decorating your festive dream home, ensuring success for beginners and seasoned bakers alike.
Imagine the aroma of warm spices filling your kitchen, laughter echoing as tiny hands press candies into place, and the immense satisfaction of showcasing a beautiful, handcrafted centerpiece. This comprehensive guide provides all the insights, tips, and practical advice you need to transform simple ingredients into a show-stopping gingerbread creation that can be eaten or proudly displayed throughout the festive period.
Crafting Your Sturdy Gingerbread Dough: The Foundation of Your Dream Home
A successful gingerbread house starts with a strong foundation: a delicious, yet structurally sound, gingerbread dough. This isn't your average soft cookie dough; it needs to hold its shape beautifully through baking and stand tall once assembled. Here's a breakdown of the key ingredients and why they matter:
- All-Purpose Flour: The primary structural component. Accurate measuring is crucial – scoop and level rather than compacting.
- Unsalted Butter: At room temperature, unsalted butter allows you to control the salt content and cream it more effectively with sugar, creating a tender crumb without excess spread.
- Brown Sugar: This isn't just for sweetness. Brown sugar contributes to the rich, molasses-like flavor and gives the gingerbread its characteristic darker hue. For an even deeper flavor, ensure you use dark brown sugar.
- Golden Syrup or Molasses: These are the secret to that authentic, deep gingerbread taste and chewy-but-firm texture. Golden syrup offers a milder flavor, while molasses provides a more robust, spicier note. You can use either or a combination. For an extra flavour boost, try substituting a small amount of golden syrup with blackstrap molasses.
- Room Temperature Eggs: Medium-sized eggs bind the ingredients together. Using room temperature eggs helps them emulsify better with the butter and sugar, leading to a smoother, more uniform dough.
- Baking Powder: Use sparingly! While a tiny bit helps achieve a tender consistency, too much will cause your gingerbread pieces to puff up and distort, compromising your house's structural integrity.
- Spices: The heart of gingerbread flavor. A classic blend includes ground cinnamon, ginger, and a pinch of salt to balance the sweetness. For an elevated flavor profile, consider adding cloves, allspice, or nutmeg, or opt for a pre-mixed "gingerbread spice" blend for convenience. Adjust the ratios to your family's preference for a milder or bolder spice kick.
Pro Tip for Dough Success: After mixing, always chill your gingerbread dough for at least an hour, or even overnight. Chilled dough is much easier to roll out evenly, cuts cleaner, and is less likely to spread excessively in the oven, ensuring your house pieces maintain their precise shapes. When rolling, aim for a consistent thickness (around 1/4 inch or 6mm) for all pieces to ensure even baking and a sturdy build.
The Magic of Royal Icing: Glue and Dazzle Combined
Forget buttercream; for a gingerbread house, royal icing is non-negotiable. This remarkable icing dries hard and stable, making it the perfect edible "glue" to assemble your house and an ideal medium for intricate decorations. To master this crucial component, you might find Best Gingerbread House Recipe: Dough, Royal Icing & Sturdy Assembly to be an invaluable resource.
Key Royal Icing Ingredients:
- Egg Whites (Pasteurized): If your gingerbread house is destined to be eaten, always use pasteurized egg whites (available in cartons) to eliminate any salmonella risk. Alternatively, meringue powder is a safe and convenient substitute that yields excellent results.
- Icing Sugar (Confectioners'/Powdered Sugar): This provides the bulk and sweetness. Sift it thoroughly to prevent lumps, which can clog your piping bags.
- Lemon Juice or Cream of Tartar: A small amount of either helps stabilize the egg whites, gives the icing a pleasant tang, and prevents sugar crystallization, contributing to a smoother, harder finish. Fresh lemon or lime juice also adds a subtle flavor.
Understanding Icing Consistency: This is key!
- Stiff Peak Consistency: Thick and pipeable, like toothpaste. This is your "construction glue" for assembling walls and roofs.
- Medium Consistency: Thinner, flows slightly but holds its shape. Ideal for outlining designs, creating intricate details, or piping "snow."
- Run-Out (Flood) Consistency: Very thin, flows smoothly to fill in outlined areas. Add tiny amounts of water until it reaches the desired flow.
Pro Tip: Always make more royal icing than you think you'll need. It's better to have extra than to run out mid-project. You can easily color portions of your icing with gel food colorings for vibrant decorative details or add extracts like peppermint or orange for a festive flavor twist.
Essential Tools and Creative Touches for Your Gingerbread Project
While the ingredients are vital, having the right tools makes the process smoother and more enjoyable. Beyond basic kitchen equipment, here are some essentials and optional extras:
Tools for Success:
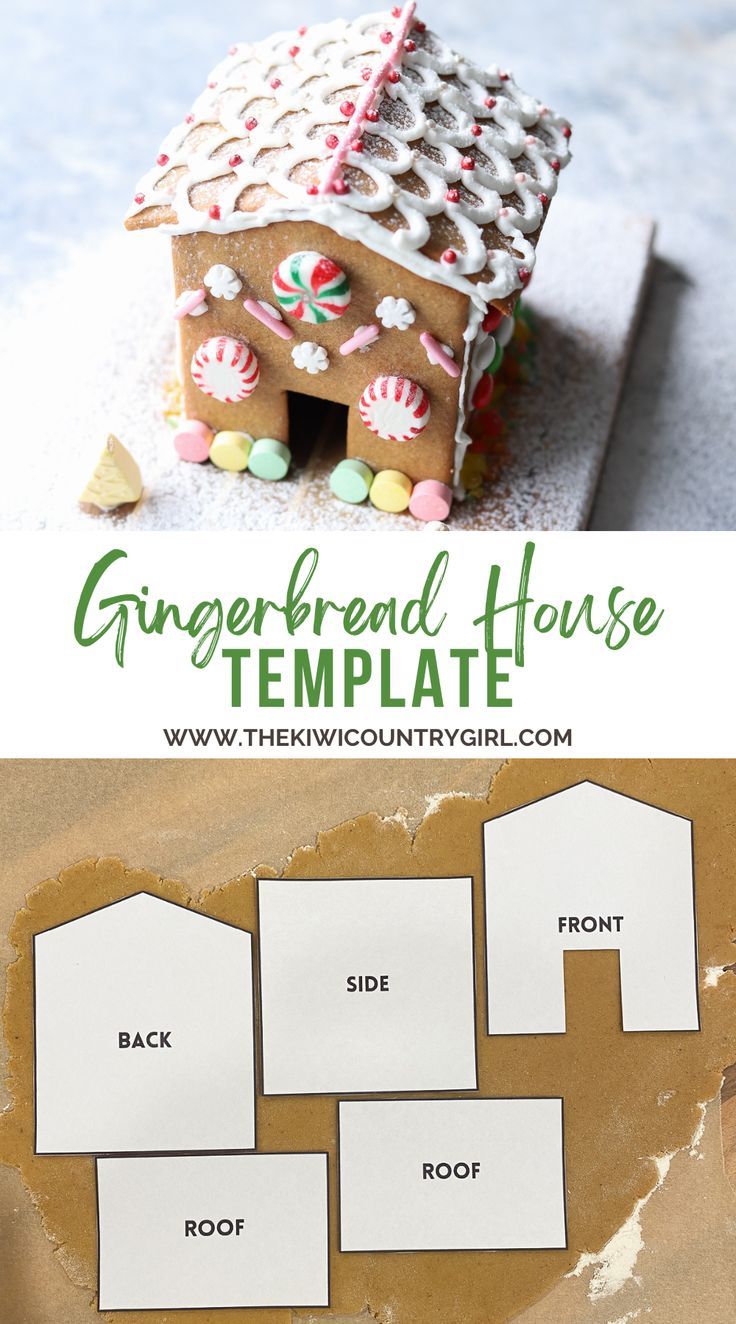
- Template Supplies: Ruler, paper (cardstock is best for durability), pen/pencil, and scissors for designing and cutting your custom house pattern. Starting with a simple four-wall and two-roof piece design is perfect for beginners.
- Baking Essentials: Baking sheets, parchment paper or silicone mats (for non-stick baking and easy cleanup), a sharp knife or pizza cutter (for clean dough cuts), and a reliable rolling pin (preferably one with thickness guides for uniform dough).
- Icing Application: Piping bags (disposable are convenient) with various piping tips (round tips for outlining and filling, star tips for decorative flourishes). Squeeze bottles or even a Ziploc bag with a tiny corner snipped off can also work in a pinch.
- Cooling Rack: Essential for cooling your baked gingerbread pieces completely and evenly, preventing warping.
Creative Touches to Elevate Your House:
- Windows: Achieve stunning stained-glass effects with crushed hard candies (placed in window cut-outs before baking) or by using melted gelatin sheets or clear cellophane once the house is assembled.
- Texture Molds: Small silicone molds can be used to create intricate gingerbread details like bricks, roof tiles, or miniature figures to add to your landscape.
- Candy Wonderland: This is where the fun truly begins! Gather an assortment of candies: gumdrops, peppermints, M&Ms, candy canes, licorice, sprinkles, pretzels, chocolate bars, and even shredded coconut for realistic snow. Think about different shapes, sizes, and colors to create a diverse and delightful gingerbread scene.
Planning Your Design: Before you even roll out your dough, sketch your desired gingerbread house design. This allows you to plan your template pieces precisely and envision where your candies and icing details will go, saving time and reducing stress during assembly.
Assembly and Decoration: Bringing Your Vision to Life
With your perfectly baked gingerbread pieces and robust royal icing ready, it's time for the grand construction! Patience is your most important tool during this phase.
Step-by-Step Assembly:
- Prepare Your Base: Use a sturdy base, like a cardboard covered in foil or a wooden board, which will hold the entire house and its decorations.
- Outline and Attach Walls: Using stiff royal icing in a piping bag, pipe a thick line of icing along the bottom edge of one wall piece and along the vertical edges where it will meet another wall. Firmly press the pieces together at right angles.
- Support and Secure: Use cans, small bottles, or even weighted objects to prop up the walls as the icing sets. This is crucial for stability. Repeat for all walls, creating a complete box structure.
- Allow to Dry (Crucial!): This is perhaps the most important step. Let your assembled walls dry completely for several hours, or ideally, overnight. Rushing this will lead to collapse.
- Attach the Roof: Once the walls are absolutely stable, pipe thick lines of royal icing along the top edges of your walls and where the two roof pieces will meet at the peak. Carefully place the roof pieces into position, holding them firmly until they can support themselves. Again, use props if needed and allow ample drying time.
Decorating Your Masterpiece: Once your house is fully assembled and the icing has hardened into a solid structure, the creative decorating can begin! For a truly comprehensive approach to ensuring your structure is sound and ready for its festive adornments, consult The Ultimate Guide to Building Your Perfect Christmas Gingerbread House.
- Start with Structural Details: Pipe "snow" along the roof edges, add window frames, and outline a door. These foundational details help define the house.
- Roof Tiles: Use square or round candies (like gumdrops or M&Ms) or piped royal icing dots to create roof tiles.
- Landscape: Create a snowy scene around the base with more royal icing or shredded coconut. Add pretzel fences, candy cane lampposts, or gumdrop trees.
- Personalize: Let each family member add their favorite candies. This makes the house truly unique and a reflection of everyone's creativity.
Pro Tip: Work in sections and let icing details dry slightly before adding more on top. Gravity is not your friend with wet icing and heavy candies!
FAQs and Pro Tips for Gingerbread House Success
Even with a comprehensive guide, questions often arise. Here are some common queries and expert tips to ensure your gingerbread house is a triumph:
Common Questions:
- How long does a homemade gingerbread house last? If stored in a cool, dry place (away from humidity), a display-only house can last for weeks. If you plan to eat it, it's best consumed within 1-2 weeks for optimal freshness.
- Can I make parts in advance? Absolutely! You can make the dough and chill it for up to 3 days. Baked gingerbread pieces can be stored in an airtight container for several days. Royal icing can be made in advance and stored in an airtight container in the fridge for a few days, just be sure to re-whisk before use.
- What if my dough is too sticky or crumbly? If too sticky, add a tablespoon of flour at a time until it's workable. If too crumbly, add a tiny splash of milk or water, kneading until it comes together.
- My walls keep collapsing! What went wrong? Most often, it's insufficient drying time for the royal icing. Patience is paramount. Ensure each joint is fully set before adding more weight. Using sturdy props is key.
Expert Tips for an Amazing Gingerbread House:
- Measure Twice, Cut Once: Your templates need to be precise. Take the time to measure accurately to ensure your pieces fit together perfectly.
- Don't Overwork the Dough: Too much kneading can develop the gluten, making your gingerbread tough. Mix until just combined.
- Bake Extra Pieces: Accidents happen! It’s wise to bake an extra wall or roof piece just in case one breaks or warps.
- Embrace Imperfections: Don't strive for perfection. The charm of a homemade gingerbread house lies in its unique, handcrafted nature. Any "flaws" can often be cleverly covered with icing or candy!
- Make it a Family Affair: Assign different roles – one person for dough, another for cutting, and everyone for decorating. This truly makes it a fun, shared family tradition.
Creating a homemade gingerbread house is more than just baking; it's an immersive experience that ignites creativity, encourages teamwork, and builds precious family memories. With this ultimate guide, you have everything you need to embark on this delightful holiday tradition with confidence. So gather your ingredients, call your loved ones, and prepare for a festive adventure that culminates in a beautiful, delicious, and utterly unique Christmas centerpiece!
